CCC - Pinball Whizzkids
Resources for the 'Pinball Whizzkids' Creative Computing Club.
During this workshop, you will use a BBC micro:bit to control a servo motor, to make your own programmable version of our Exploration Zone's 'Balls Down the Wall' exhibit.
This page recaps what we discussed as a group.
Coding a micro:bit in Python
Open the Python editor by visiting python.microbit.org/. Your screen will look something like this:
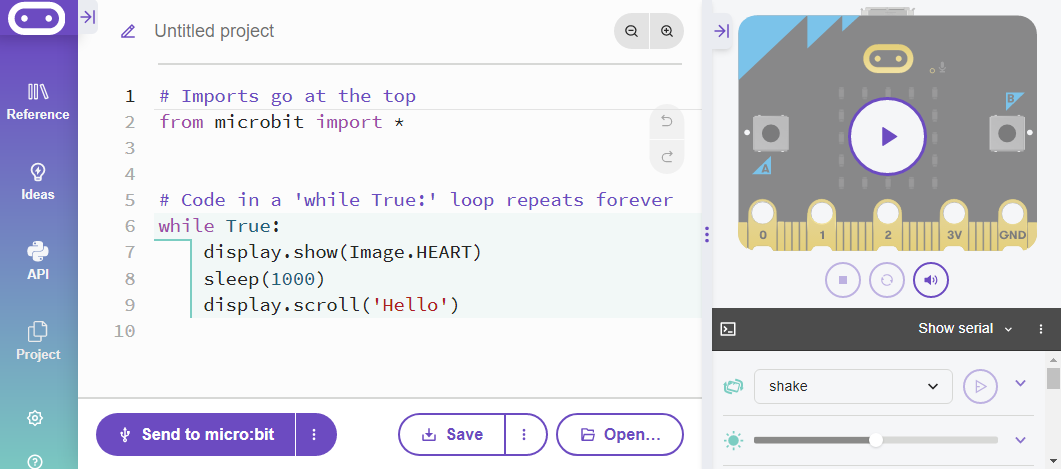
- In the middle is where you will add your own code.
- On the left-hand-side is the reference menu - you can see examples of some of the code here, as well as help understanding these examples.
- On the right-hand-side is the simulator - a pretend micro:bit you can use to test your code.
- On the bottom is the Send to Micro:bit button, which you will use to send code to your physical micro:bit.
Edit the code on the screen, then flash it to your micro:bit to see the changes.
Try:
- Editing the
Imagethat is shown (hint: check the reference menu, under Display, for a list of images) - Changing the number in the brackets after
sleep(hint: this tells the micro:bit how long to keep your image on the display) - Making the micro:bit scroll your name instead of
'Hello'
The micro:bit's A and B buttons are very useful to choosing when to make something happen.
Modify the code on your screen so that it only happens when you press button A.
Python uses indentation (whitespace on the left) to know which bits of code to run. Take a look at the below code, and look at which parts are in line with each other.
while True:
    if button_a.was_pressed():
        display.show(Image.HEART)
        sleep(1000)
        display.scroll('Hello')
Making things move
A servo motor is a specific type of motor that can be given a precise position. The servos you are using in this workshop have been attached to a linear gear system, so when the servo motor turns, the gear pushes a stick up and down.

You are going to use this system to control when a ping pong ball is released into your Balls Down the Wall exhibit.
Connect your servo to the micro:bit by connecting:
- The un-insulated crocodile clip with white wire to Pin0 on your micro:bit.
- The other crocodule clip to GND on your micro:bit.

For full wiring instructions, click here.
To start, try the code below, which turns the servo to it's maximum and minimum positions using the micro:bit's buttons:
while True:
    if button_a.was_pressed():
        pin0.write_analog(40)
    if button_b.was_pressed():
        pin0.write_analog(130)
Challenge: use just one button to move the servo up and down. Use sleep() to control the timing.
Engineering
Now that your servo motor is moving, you can begin to physically create your 'Balls Down the Wall'.
Use masking tape to attach your servo motor to your backing cardboard, and hold your tube in place (ask your grown-up to help you!) - getting the angle right can be tricky, so practice a few times before using the glue guns to attach it securely.
- If the angle is too steep, your ping pong ball might move to fast and bounce over the servo.
- If the angle is too narrow, the ball might not move at all!
Challenge: use just one button to move the servo up and down. Use sleep() to control the timing.
Adding some randomness
Make your exhibit more exciting, by letting the micro:bit decide when to release your ping pong ball!
Currently, when you press a button on the micro:bit, the servo moves immediately. By adding sleep() beforehand, it will pause first.
while True:
    if button_a.was_pressed():
        sleep(1000)
        pin0.write_analog(40)
Test your new code to make sure it works.
We will replace the number inside sleep() with some new code, to pick a random number.
Before we can do this, at the very top of your program, add this line:
from random import randint
This is needed so that the micro:bit understands the rest of the instructions.
Go to your sleep(1000) line, and replace the 1000 with randint(500, 2000).
This asks the micro:bit to choose an random integer (random whole number), between 500 and 2000, meaning it will wait 0.5-2 seconds before moving the servo.
Try it out, then adjust the numbers - edit the code until you are happy with it.
Next steps
Engineering: add more paths for your ping pong ball to follow.
Programming: look through the Sound reference menu, and add sound effects and display effects to your exhibit.
Challenge: add a second servo motor, perhaps one that tilts your ball left or right. Consider your wiring, programming, and it's placement in your exhibit.
Challenge: perfect your linear servo so that only one ball can drop through at once. Consider it's timing and position in your code, and the ball position and angle on your exhibit.