A timer can be extrememly useful, it can count the minutes or hours, to give you repeating instructions, or can count down to a specific event.
How about reminding yourself to go and wash your hands every hour? Or setting a 2 minute countdown for washing your hands?
The micro:bit doesn't have a clock, so it can't keep track of the time in the same way as we do.
It does know how long it has been turned on for, so you can use that to check how much time has passed.
The example code below sets up the timer using variables. Scroll down for instructions, or skip to the end once your new code is working correctly!
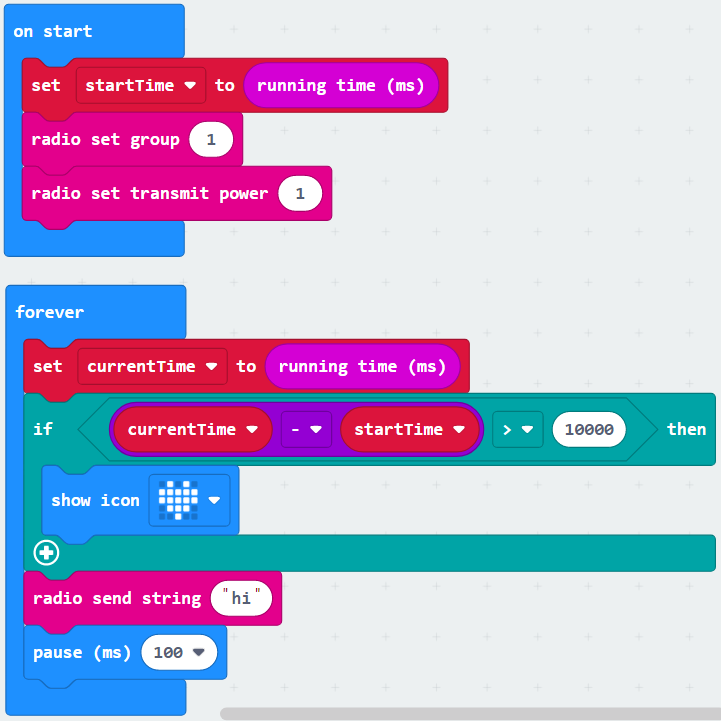
Click the Variables menu, and create a new variable called startTime. This is what you will use to 'start the timer'.
Still in the Variables menu, drop set startTime to 0 into your on start loop.
Find running time (ms) in the Inputs menu and replace the 0 with it.
The micro:bit will now start timing as soon as it turns on - you might want to change this later, but it is good practice to debug your code before making any changes!
Repeat what you did above to create and set a variable called currentTime, this time place your code inside the forever loop.
This is how you will keep track of how long the timer has been running for.
You now have two variables - one for the start time, and one for the current time. If you minus the start time from the current time, you know how many milliseconds the micro:bit has been running for!
Combine an if then block from the Logic menu, a 0 - 0 block from the Math menu, and your two variables from the Variables menu.
We chose 10 000 milliseconds, which is 10 seconds, as the amount of time for the timer to run before something happens.
Test this out, and once the code is running sucessfully, start making some changes!
Is 10 seconds a useful timer? How long do you want to time for?
Do you want the timer to start when the micro:bit first turns on? You could use an input to start the timer instead.
What do you want to happen when the timer goes off? Try connecting a speaker or an LED, to make the micro:bit beep or flash a warning.