Session 4: assembly and testing
You now have everything you need to build your robot
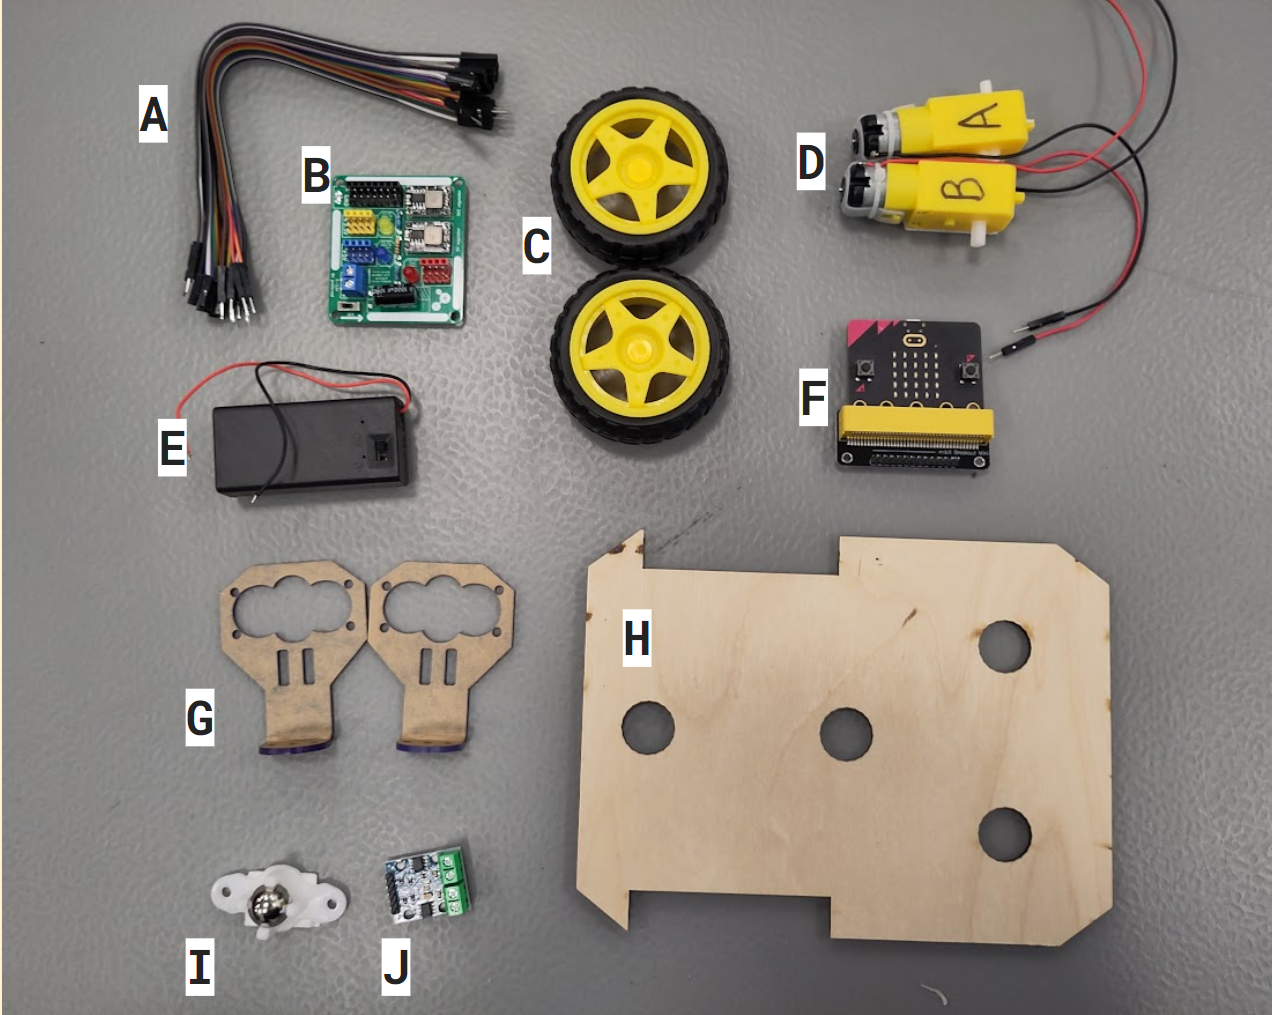
Component list
- Selection of wires
- Soldered power board (from Session 2)
- Two wheels (to fit the motors)
- Two motors with red and black wires attached
- Battery pack (to fit a 9V battery)
- Connector for the micro:bit (and your micro:bit, to use with code from Session 1)
- Two holders for distance sensors (after testing that your robot can move, you will add in the sensors)
- Laser cut robot base (from Session 3)
- Castor wheel
- Motor driver board (to translate between the micro:bit and the motors)
Assembly
Follow the instructions here to assemble your robot.
Testing your motors
If you have wired up the motors according to the instructions, the test code should:
- Turn both motors in the forward direction
- Turn both motors in the backward direction
- Turn one motor forwards and the other backwards, so that the robot spins left
- Turn one motor forwards and the other backwards, so that the robot spins right
Download the test code, open it using the online Python editor, and put the code onto your micro:bit.
Press A on your micro:bit to run the code.
Does your robot move as described in the list above?
If yes, your robot does not need troubleshooting, and you can move on to the next section!
If it is not moving as described, look for your problem here.
My robot isn't moving at all!
- Check that the robot is on.
- Send the code to the micro:bit again, and make sure no errors show up.
If this doesn't help, ask a workshop leader to help you.
Only one of my motors is turning!
- Check for loose wires - has anything come off?
- Check the wires on the micro:bit connector - are they definitely in pins 12-15?
- Make sure that the micro:bit is pushed very firmly into its connector.
If this doesn't help, ask a workshop leader to help you.
One or both of my motors will not stop turning!
- Check the wires on the micro:bit connector - are they definitely in pins 12-15?
- Make sure that the micro:bit is pushed very firmly into its connector.
- Send the code to the micro:bit again, and make sure no errors show up.
If this doesn't help, ask a workshop leader to help you.
One of my motors is turning the wrong direction!
(it spins when it should go forward, and goes forward when it should spin)
- Check the wires between the motor driver and the micro:bit connector. Check the instructions, and make sure that they all go to the right place.
If this doesn't help, ask a workshop leader to help you.
Both of my motors are turning the wrong direction!
(it goes backwards when it should go forward, and turns left when it should turn right)
This can be changed either by moving the wires, or by changing the code.
Ask a workshop leader for help with this.
Test driving
Now that you know your robot works, test out its capabilities by driving it in different directions at different speeds.
- Do any of the wires catch on the ground while it is driving? Tape them out of the way if so.
- Does it tip over when speeding up? Could you move the motors or the castor wheel to make it more stable?
Work on your robot's motor code so that you can use the best values in the sensor code next time.
- What is the minimum speed that still allows the motors to turn?
- What values give a good full or quarter turn in each direction?
- Is one wheel slower than the other? Can you edit your code to make it more consistant?
Save your code so that you can carry on next time.
Your robot code
Congratulations, your robot works!
In Session 5, we will add the sensors and test your robot code, so that it can use the distance sensors to decide how to move.
You can choose to either...
- Go back to the Session 1 instructions, and use them to edit the code you have used today to set up the distance sensing algorithm.
- Get your code from Session 1 (a link was emailed to you, or speak to a workshop leader), and edit the motor speeds based on today's testing.