Session 5: programming and challenges
Test driving
Before making any changes, check that your robot still works as expected, by running the test code again (press A on your micro:bit).
- Has anything come loose? Check your connections.
- Do any of the wires catch on the ground while it is driving? Tape them out of the way if so.
Wiring the distance sensors
Component list
From a workshop leader, collect two ultrasonic distance sensors with wires attached.
From your previous set of equipment, you need some wires.
Wiring
Go to the end of the assembly instructions from earlier to see the wiring instructions, or follow the steps below.
- Attach the two sensors to the holders on your robot using the foam tape.
- On both sensors, use a wire to attach the GND pin to the black GND section of your power board.
- On both sensors, use a wire to attach the Vcc pin to the blue 5V section of your power board.
- Take the wire that is connected to both sensors - this is the Trig pin. Connect it to the micro:bit connector pin 0.
- On both sensors, very carefully attach a wire to the end of the resistor on the remaining pin.
- Attach the wire on the front sensor to the micro:bit connector pin1.
- Attach the wire on the side sensor to the micro:bit connector pin2.
Testing the sensors
To test the sensors, use the same code as before, but the micro:bit must stay plugged in to the computer.
- Send the code to the micro:bit again.
- Open the serial terminal at the bottom of the editor.
- Click the button on the back of the micro:bit to restart your code.
- Press B on the micro:bit to run the sensor test.
What numbers do you get?
If the sensors are working correctly, they should change as objects are moved closer to or further away from the sensors.
If they do not change, or you get e.g. -0.03, speak to a workshop leader for some troubleshooting help.
Distance sensor code
You can now program your robot to avoid obstactles, or you follow you around.
Download the example code, or use the code you worked on in Session 1 (ask a workshop leader to help you find this).
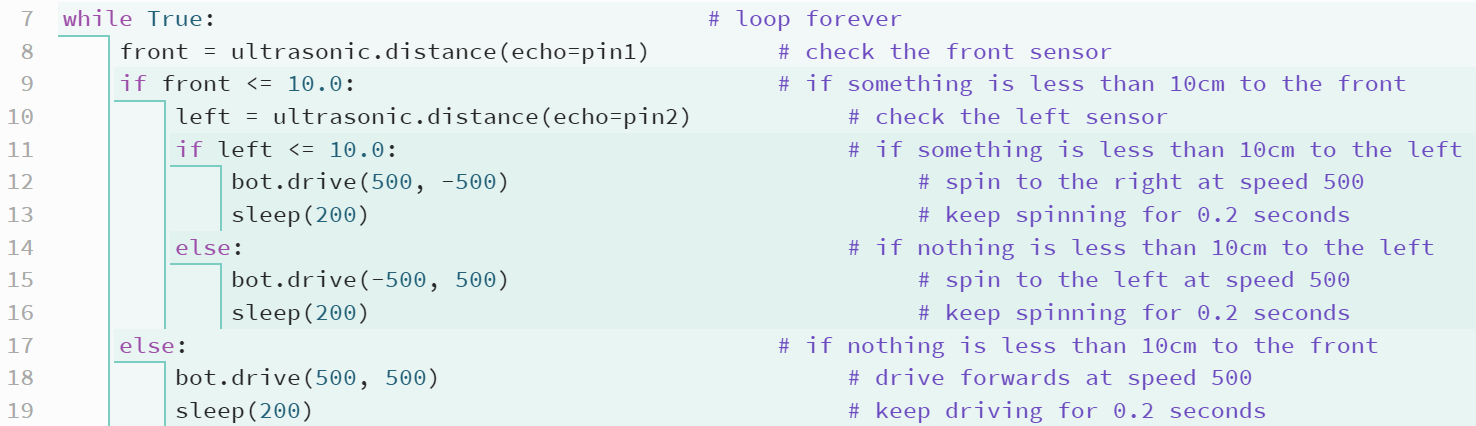
The logic section of the code is this:
Or in flow chart form:
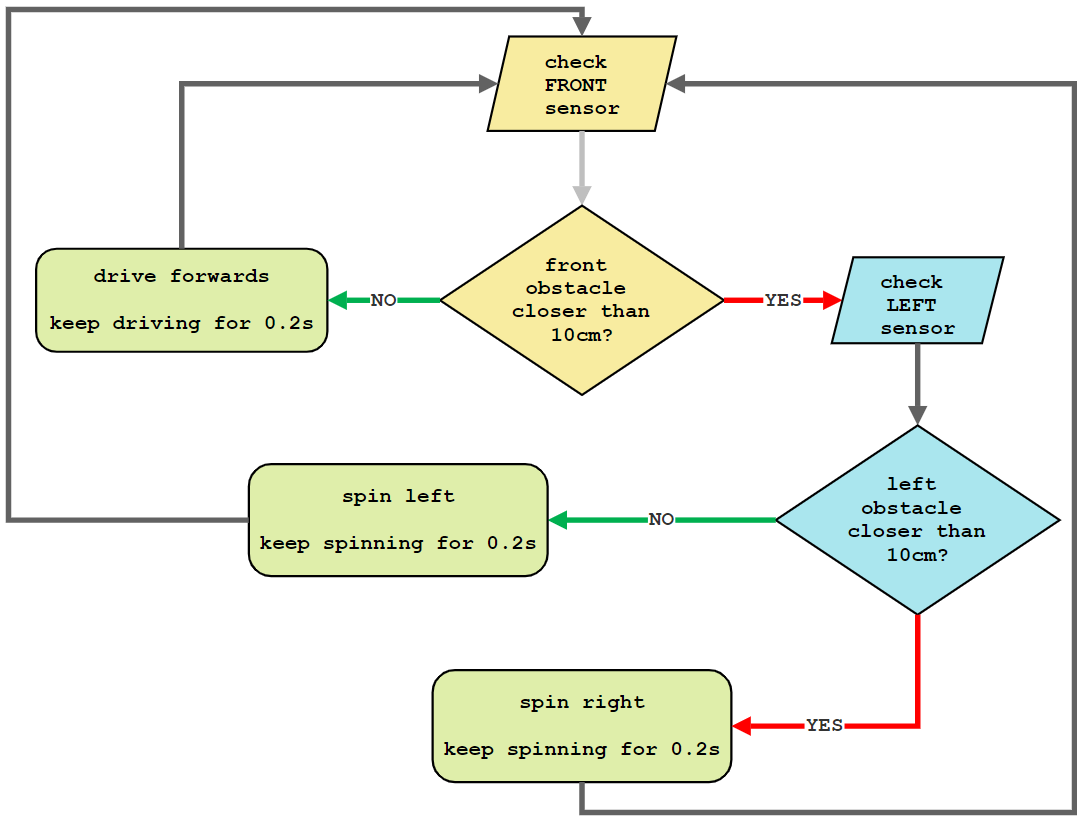
Test your robot with this code, then decide what changes you want to make:
- Does it keep driving into obstacles? It could be moving too fast, or not checking the sensors often enough.
- To slow it down, change the numbers in the |
bot.drive()| functions. - To check more often, change the numbers in the |
sleep()| functions. - Does it turn too early? It could be reacting when the obstacle is further away than it needs to be.
- To change how closely it reacts to obstacles, change the number in the |
if sensor <=| statement. - Do you want your robot to follow instead of avoid? Change what the robot does after checking the sensors.
- If the obstacle is closer than 10cm away, it should move instead of turn.
- It should turn towards the obstacle instead of away from it.
Use the code print outs and flowchart to help you make your changes.
What next?
Once your robot works, you can try some more advanced coding to give your robot more functionality, or make the code more efficient. For example:
- Use variables to keep track of the driving and turning speeds, and the distance from the obstacles. This will make it easier to make changes to your code in the future.
- Use the micro:bit's buttons to change the speed, so you can make it run faster or slower depending on the complexity of the obstacle course.
- Use the micro:bit's buttons to change between a 'AVOID' and a 'FOLLOW' mode.